
In the last issue of the Rusty Spike I took up most of the article space available with my dissertation on why I needed a lake freighter. Now, of course, you expect an article on how to build such a beast. Before your expectations run wild, be aware that my ship is meant to be a background prop for an operating railroad. It will be close, but if it isn't exact, I don't nit pick. The "ship" is made from sheet styrofoam cut to shape and painted with Kilz. Card stock plates are glued in place I then painted the works and mixed in details.
First the hull... I cut the hull from styrofoam house insulation, the good stuff without the 'beads'. Make your "hull" 4.5 inches wide and 42 inches long and 2 inches thick. The ship will be 560 scale feet long which is consistent with the plans I was using. I acquired my plans from the "Institute for Great Lakes Research" at Bowling Green State University in Perrysburg Ohio and used a copy machine to adjust the plans to N Scale and for making my templates.
Draw a center line down the length of the hull half way across (thus the name center line). See Fig.1
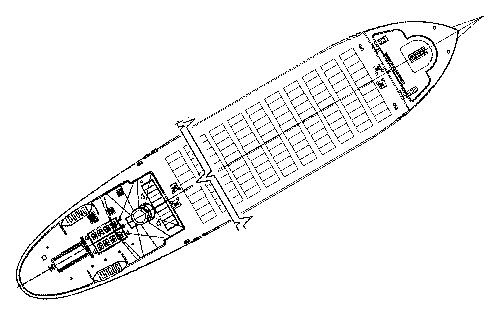 Fig 1
Fig 1I made all my templates half arc so it's necessary to draw one arc and flip the template for the other half. Start with the bow, draw the bow and cut vertically. Since the ship we're modeling was built around 1920, there isn't much fancy about it. Next, round out the bottom of the bow with one of those Stanley wood rasps. It's time for that paper face mask.. remember the filings won't come out of your lungs. A lot of eye-balling is required. Take a look at the picture and start rounding the curve as you see it. Now there's a real technical instruction!
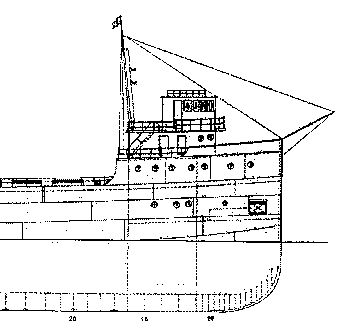 Fig 2
Fig 2Repeat the template trick at the stern. Again cut vertically to form the basic shape. Now study the picture of the ship's stern for a few minutes. The vertical section goes down about 5 scale feet from the rail and rounds out sharply from there. If they didn't go for fancy bows, there seemed to be few restrictions at the stern. I don't have bulkhead templates so I shaped, eyeballed, shaped, eyeballed again etc. Work both sides, and eyeball frequently. You can't put it back on so go slowly. Once you have the shape, use sandpaper to smooth it out. (See Fig 3)
You can now make a decision that will save you a lot of work! If your ship represents one that is "fully loaded" or if you messed up and took off too much stock, measure 20 scale feet down from the rail and cut it off! You save a lot of work on the propeller, rudder, and bow curves and hide mistakes.
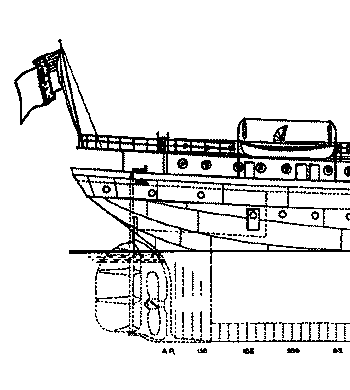 Fig 3
Fig 3Once the basic shape of the hull is developed, set it aside for a few minutes. Get some one inch styro-foam and cut out an additional bow section using the bow template. This piece is about 55 scale feet long so you end up with just the arc before it stops. (See Fig.2) You need about 4 scale feet of additional height at the bow so cut the one inch foam to about one third its thickness after cutting the second bow pattern. Glue it over the ship bow using white glue and straight pins. Let it dry.
Measure from the very stern forward about 65 scale feet. Draw a line across the ship at that point. You now have the main deck area defined as the area between that line and the additional bow section that you added. The main deck is slightly rounded for structural purposes. It falls off about 2 scale feet from the center to the rail. Work carefully and utilize that calibrated eyeball that you've developed. Again use the face mask and the wood rasp or sand paper. Don't get real concerned if you take it down three or even five feet as long as it is smooth and even from one end to the other. I don't know of any N scale people who are able to tell the difference!
Next we tackle the pilot house. Three templates are required for this step. Cut both levels of the pilot house out of one inch styrofoam and cut the second level deck out of manila folder stock. Glue the deck between the two levels and align the front of the top level arc just above the front of the lower one. Look at the drawing to see what I'm talking about. Glue the assembly to the bow area of the ship.
(To be Concluded)
Last updated February 19, 1996.
Copyright 1996 by Roger P. Hensley