
The stern (Fig.4) houses crew quarters, galley, and engine room. Two templates are required. Cut the deck out of manila folder and the structure out of one inch styrofoam. Take a good look at the drawings and glue them to the ship.
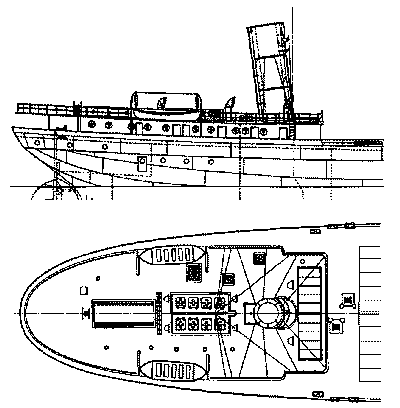 Fig 4
Fig 4Kilz is a spray paint that is available at any of the builder super stores in the area. It only comes in white but it allows paint to be applied to the styrofoam without eating the foam! Real handy for this project. When you paint everything white with Kilz, the results look like a ghost ship. If you have a lot of natural brass locomotives, perhaps you can just leave the ship in white.
I painted the decks, pilot house and crew/galley gray. Windows and doors were painted on at this point. Next we add the steel plates for the hull. The plates are cut from 3x5 card stock. I cut each plate 10 scale feet wide and 30 scale feet long. I have no idea what the actual plate width and length were since the drawings I have are inconclusive. Cut a bunch of plates, you'll need them. Start at the rail in the center of the ship. Glue the plates so that the first course is about 2 scale feet above the edge of the cargo deck. In N scale this will work for both the ship side and the rail that is attached to it. I worked one course at a time and staggered the plates so that the second course started in the center of the previous one. At the bow and stern you must trim the plates to fit the contour of the ship. Refer to the pictures to get the proper feel for bow and stern. You can paint your ship either dark green or black. I chose dark green and used white rub-a-dub type letters to spell out Cleveland Cliffs on the side; one of the major freight carriers on the Great Lakes, now owned by George Steinbrenner of New York Yankees fame.
 Fig 5
Fig 5The deck hatches (Fig 5) on my ship were incorrect. Captain Nelson, when he visited here during the Regional Convention, revealed that all coal and ore shouts were 12 feet apart so all measurements were multiple of 12 feet. This of course governs how many deck hatches there were and how big they are. So, to build your hatches cut 3x5 card stock 8 scale feet wide and of 15, 30, 40, and 50 scale foot lengths. Fold each one in half, now center and glue one 15 footer on top of the 30, center and glue those to the 40 and that construction to the 50 foot piece. Paint the top and sides brown. When you have a bunch of those built, start in the center of the main deck, measure out 12 feet draw a pencil line repeating a line every 12 feet the length of the deck. Glue a hatch on the edge of each line until there you cover the entire deck leaving 10 feet at the bow and stern of the deck area.
Details... Each ship had a steering pole protruding from the bow (Fig 6). The Wheel Man couldn't see the front of the ship from the wheel. This caused a lot of problems when coming into port so a white steering pole was set out in front of the ship for the wheel man to guide on! Make yours about 30 feet long. There are 3 masts on the ship, I used copper tubing of a narrow diameter for these. The "stack" is wood doll rod cut 35 feet long and angled at the base to achieve the proper look. Paint it black. There is a sky light behind the "stack". As the drawings on this item were inconclusive, I made mine 15 feet wide and 20 feet long using scrap styrofoam. Both life boats are styrofoam and are suspended from copper tube bent to shape. One nice feature of working with styrofoam is that wires can be stuck into it easily. I used piano wire for the rails and stuck the stanchions into the foam and glued them with ACC. All railings were soldered to the stanchions.
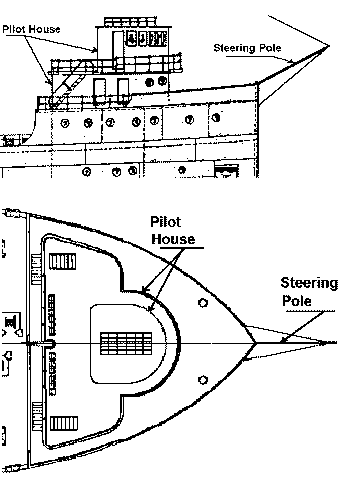 Fig 6
Fig 6My ship isn't finished yet. I don't have anything that can be used for port holes, anchors or air intake ducts. The plan calls for 6 air intakes, 4 anchors and many port holes, I just haven't found a source for them. Any ideas would be appreciated.
Editor's Note: I have seen Norm's ship and in sheer size it is impressive, dwarfing the locomotives and cars on the adjoining tracks. Seeing his ship almost makes me wish that I were in N scale instead of HO (almost). Norm will share the details and plans with anyone wanting to know more about this project. R
Last updated March 22, 1996.
Copyright 1996 by Roger P. Hensley